Overview:
Unity allows you to create RenderTextures of various dimensions. A render texture dimension represents the underlying backing texture resource. For example, the backing resource could be a texture 2d, texture array, Cubemap, etc. For a list of supported texture dimensions, look here. Most of the time, developers are working with Texture2Ds. However, sometimes, it can be convenient to use a Texture Array however it may not be immediately obvious how to render to a texture array. In this article, I am going to show you how to render to and read from a texture array in Unity.
The Internals of a Unity Render Texture:
In the unity engine code, a render texture is composed of multiple buffers. Assuming you are using a texture 2d, the render texture layout would look like the following.
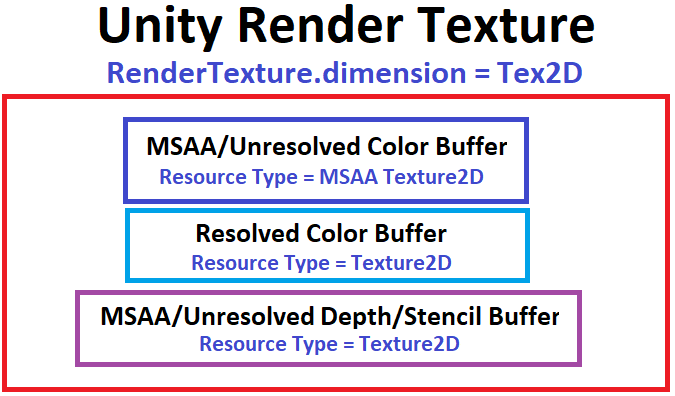
As you can see in the picture above, the Unity render texture will manage three separate buffers. Assuming you are using MSAA, the Unity render texture would maintain an unresolved color buffer, a resolved color buffer, and a depth/stencil buffer. If you were not using MSAA, it would look like the following.

The main difference would be that an unresolved MSAA color buffer would not exist. Also, the depth buffer would not be unresolved either. When using MSAA, Unity renders to both an MSAA color buffer and depth buffer. When the color buffer is resolved, the unresolved depth buffer is discarded as it is no longer needed. When you create a render texture that has a dimension of “Tex2DArray”, then the unity render texture layout looks like the following.
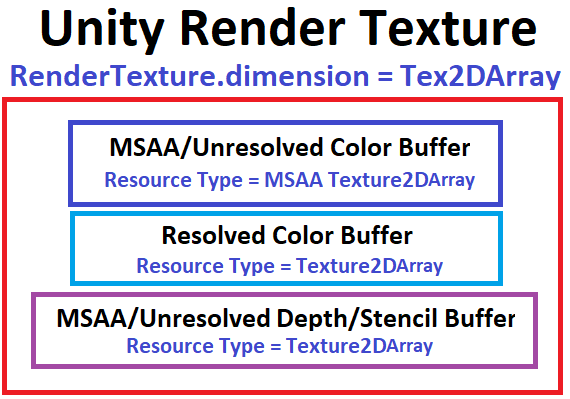
As you can see, from Unity’s perspective, it looks very similar to the texture 2d case. The only difference is the underlying resource type.
What is a Texture Array?
A texture array is pretty much what it sounds like. It is an array of textures. Texture Arrays allow you to bind multiple textures to a single texture object. Most GPUs have builtin hardware support for texture arrays. This means GPUs understand natively how to sample them and render into them. For more information, click here. We call each texture in a texture array a “texture slice”. Texture arrays are index zero-based. Therefore slice 0 refers to the first slice in the texture array and slice 1 refers to the second slice in the texture array. Each texture slice needs to be of the same width, height, msaa state, and format.
Why Should I Care?
Once upon a time, in a land not too far away, when folks wanted to render various kinds of objects, they would run into performance issues due to graphics driver state changes. The graphic driver state changes were mostly due to uploading different kinds of textures and submitting multiple draw calls for various objects. For example, if you wanted to render a fancy UI with lots of different iconic buttons, you would need to upload a different texture for each button. Each time you uploaded a new texture and submitted a new draw call, a considerable price was paid sending the data over the wire from the CPU to the GPU. Later on, folks started using texture atlases to batch their geometry and get around this issue. Basically, you would have one large texture with all the different button icons and you would upload the texture once and then have each button draw call reference different uv coordinates. This worked well but it was a pain and required a lot of special tooling to generate the atlases and maintain the uvs. Texture Arrays mostly solved this problem by allowing you to upload multiple texture sheets from which you could reference and reuse uv coordinates. Texture Arrays also provide a performance benefit when compared to 3D Textures. The texture array spec states the following
Texture lookups do not filter between layers, though such filtering can be achieved using programmable shaders.
In other words, there is no three dimensional filtering between slices in a texture array whereas there would be if you were using a 3D texture. Nvidia exploited this performance gain in their texture array terrain example. In the case of stereo rendering, texture arrays and draw call instancing is a match made in heaven! They are like peanut butter and jelly! In fact, when we added support for stereo single pass instanced rendering, I was found around Unity doing the following dance.
How Do You Create a Texture Array in Unity?
First, you need to fill out a RenderTextureDescriptor and then pass it into the RenderTexture’s constructor.
|
1 2 3 4 5 6 7 8 9 10 11 12 |
RenderTexture renderTextureArray; void Start() { RenderTextureDescriptor d = new RenderTextureDescriptor(Screen.width, Screen.height, RenderTextureFormat.ARGB32); d.dimension = TextureDimension.Tex2DArray; d.volumeDepth = 2; // We will have 2 slices (I.E. 2 textures) in our texture array. renderTextureArray = new RenderTexture(d); renderTextureArray.Create(); renderTextureArray.name = "My Render Texture Array"; } |
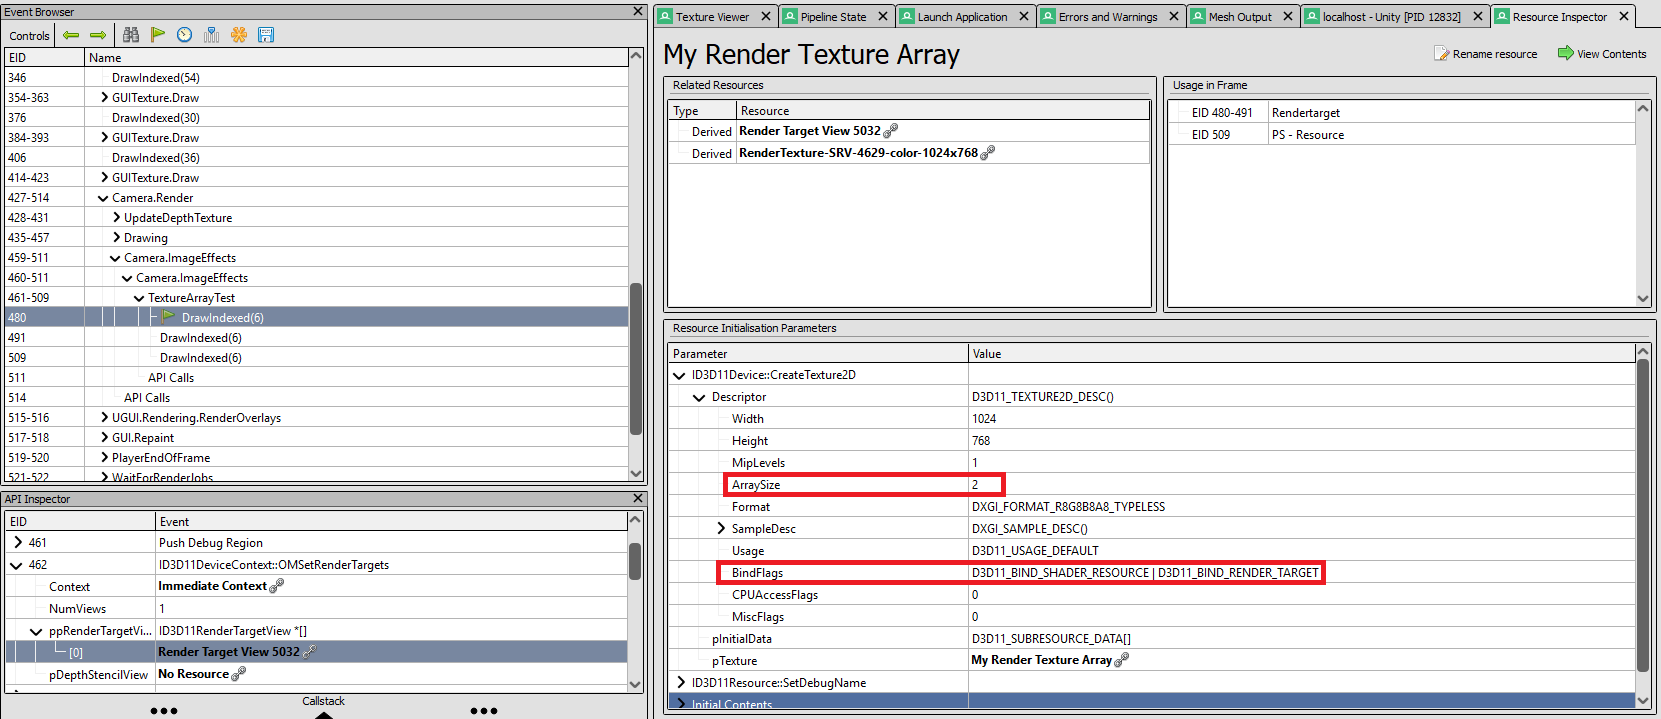
As you can see in the RenderDoc capture below, when a texture array is created, like in the example above, a D3D11 texture resource is created with an array size greater than one. This informs the graphics driver that we will need a texture array resource.
You can then bind either an individual slice or all the slices at once to render to. For example, sometimes you may want to pretend that the texture array is a single texture 2D. In such a situation, you would use a resource view that would only grant access to a single slice of the texture. In the example below, however, we wish to bind both slices of the texture array.
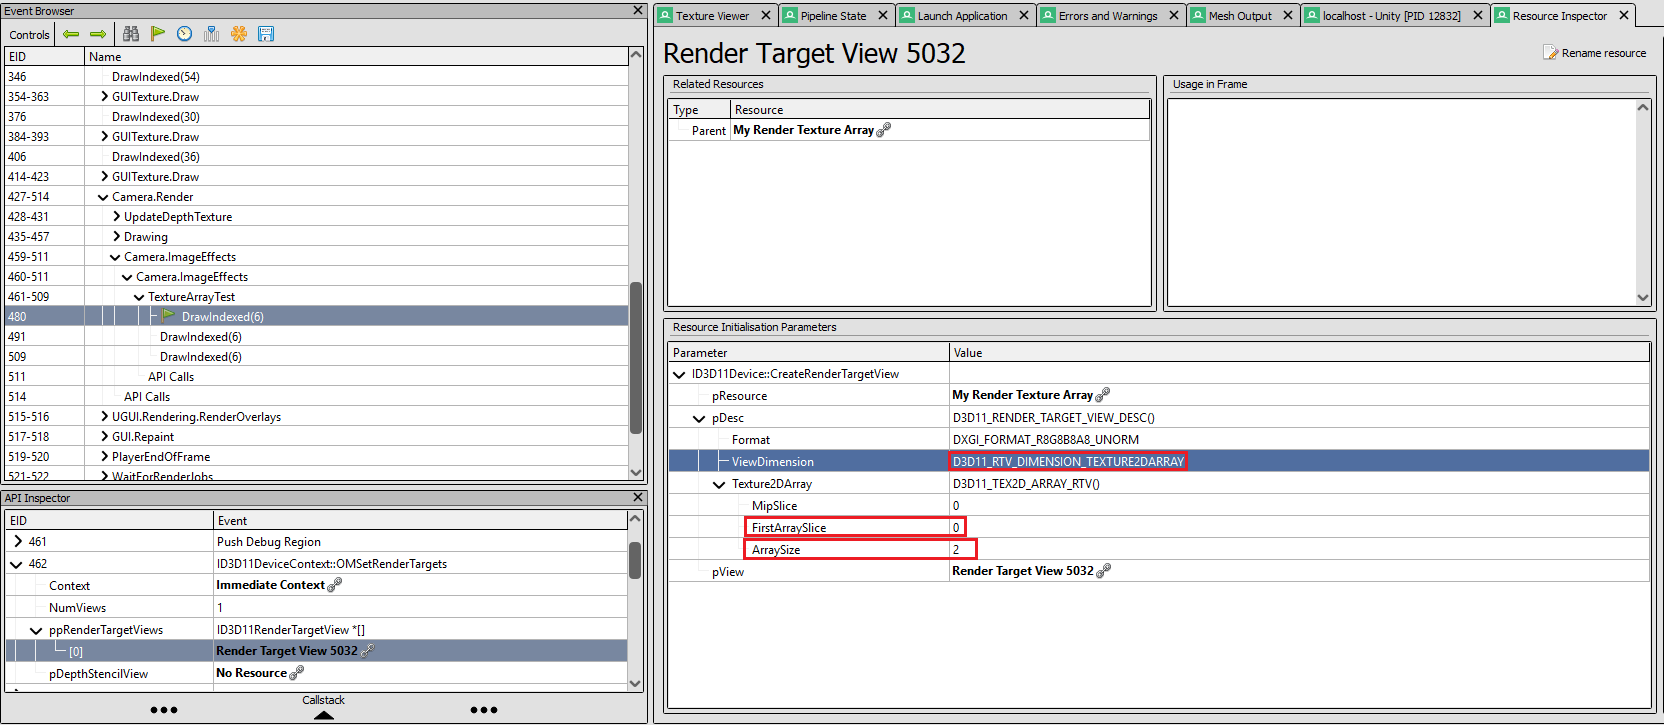
The FirstArraySlice is set to 0 and the ArraySize is set to 2. This informs the graphics driver to allow the shader to write to both slices of the texture array. If we only wanted a shader to access the first slice, then we would use a resource view where the FirstArraySlice was set to 0 and the ArraySize was set to 1. Likewise, if we only wanted the shader to write to the second slice, then we would use a FirstArraySlice of 1 and an ArraySize of 1.
How Do You Render to a Texture Array in Unity?
You render to a texture array almost the same way you would render to a texture 2d. You still need to pass your RenderTexture’s color buffer into the Graphic.SetRenderTarget command. However the color buffer will be using a native graphics texture array. The main difference is that you need to tell Unity which slice to bind. The “depthSlice” argument communicates to Unity which slice of the texture array you wish the shader to have write access to. If you want the shader to write to the first slice, then set the depthSlice to 0. If you want the shader to write to the second slice, then set the depthSlice to 1. Now you might be asking at this point, “What if I want to bind all the slices?”. Great question! In that case, use the magic number “-1”. Unity will then use a special resource view which will grant permission to the shader to write to all the texture array slices. If -1 is used for the depthSlice argument, the resource view’s FirstArraySlice will be set to 0 and the ArraySize will be set to how ever many texture slices you requested to be created in the RenderTextureDescriptor via the “volumeDepth” parameter. The following code snippet demonstrates how to bind all the texture array slices thus providing the shader access to write to them all.
|
1 2 3 4 5 6 |
Graphics.SetRenderTarget( renderTextureArray.colorBuffer, renderTextureArray.depthBuffer, 0, CubemapFace.Unknown, -1); // -1 indicates that we want to bind all the texture slices. |
Now keep in mind that a shader is not required to render into each of the texture array slices just because the CPU side script granted permission to do so. It is ultimately up to the shader to pick which slices it will render into. Furthermore, a shader can render unique images into each of the texture slices if it so chooses.
In the sample project, provided below, are two scenes which demonstrate how to render into a texture array.
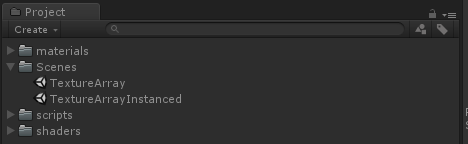
Both scenes ultimately do the same thing. They both create a texture array of size 2 and render red to the first slice and green to the second slice. However, the way they go about it is what is different. The “TextureArray” scene demonstrates how to write to both slices using two separate draw calls. Whereas the second scene called “TextureArrayInstanced” demonstrates how to write to both texture arrays with a single instanced draw call.
You can view both slices of the texture array in RenderDoc by selecting the “Slice/Face” dropdown menu.

How Does the Shader Pick Which Slice to Render To?
This is done via the “SV_RenderTargetArrayIndex” hlsl semantic. For more information about all builtin HLSL semantics, click here. The following is an example which demonstrates how to write to the second slice in a texture array.
|
1 2 3 4 5 6 7 8 9 10 11 12 13 14 15 |
struct v2f { float4 vertex : SV_POSITION; uint depthSlice : SV_RenderTargetArrayIndex; }; v2f vert (appdata v) { v2f o; o.vertex = v.vertex; // Tell the GPU to only allow the fragment shader // to write to the second texture array slice. o.depthSlice = 1; return o; } |
In the past, you were only allowed to write to set the SV_RenderTargetArrayIndex” in a geometry shader. However, recently, to avoid geometry shader related performance issues, GPUs have supported the ability to write to a specific texture array layer in the vertex shader. In order to do so, your GPU most support the DirectX extension “VPAndRTArrayIndexFromAnyShaderFeedingRasterizer“.
What About OpenGL?
Yeah… What about OpenGL? Just kidding guys! For OpenGL, your GPU must support one of the following GL extensions.
If one of the above GPU extensions is available, then gl_Layer can be set in a vertex shader. Unity’s shader compiler will automagically detect the usage of SV_RenderTargetArrayIndex in your HLSL code and translate it to use gl_Layer and require the GL_AMD_vertex_shader_layer extension.
How Do You Sample From a Texture Array in a Shader?
Almost the same way you would a texture 2D! For a texture 2d, you use a 2D UV coordinate to sample the texture with. With a Texture Array, you use a 3D UV coordinate where the z component specifies which slice you want to sample from. The following is a shader included in the project which shows how to declare and sample from a texture array in Unity.
CustomTextureArrayBlit.shader
|
1 2 3 4 5 6 7 8 9 10 11 12 13 14 15 16 17 18 19 20 21 22 23 24 25 26 27 28 29 30 31 32 33 34 35 36 37 38 39 40 41 42 43 44 45 46 47 48 49 50 51 52 |
Shader "Unlit/CustomTextureArrayBlit" { Properties { _MainTex ("Source Texture", any) = "" {} } SubShader { Tags { "RenderType"="Opaque" } Cull Off ZWrite Off ZTest Always Pass { CGPROGRAM #pragma vertex vert #pragma fragment frag UNITY_DECLARE_TEX2DARRAY(_MainTex); uint _DepthSlice; #include "UnityCG.cginc" struct appdata { float4 vertex : POSITION; float2 uv : TEXCOORD0; }; struct v2f { float4 vertex : SV_POSITION; float3 uv : TEXCOORD0; }; v2f vert (appdata v) { v2f o; o.vertex = mul(UNITY_MATRIX_P, v.vertex); o.uv = float3(v.uv.xy, _DepthSlice); return o; } fixed4 frag (v2f i) : SV_TARGET { fixed4 color = UNITY_SAMPLE_TEX2DARRAY(_MainTex, i.uv); return color; } ENDCG } } } |
You don’t really need to have a property block for this kind of shader. Property blocks are designed to expose certain shader uniforms to an Artist or Design who can tweak them through the inspector panel. However I wanted to include the property block to show how you could expose a texture array to an Artist. Just use the “any” type if you are using a texture array.
What About Instancing?
Texture arrays and draw call instancing work beautifully together.
If you want to render X number of unique images into a texture array of size X, you can simply assign the SV_RenderTargetArrayIndex value to whatever the current instance id is like in the following example.
|
1 2 3 4 5 6 7 8 9 10 11 12 13 14 15 16 17 18 19 20 21 |
struct appdata { float4 vertex : SV_POSITION0; uint instanceId : SV_InstanceID; }; struct v2f { float4 vertex : SV_POSITION; uint depthSlice : SV_RenderTargetArrayIndex; }; v2f vert (appdata v) { v2f o; o.vertex = v.vertex; // Tell the GPU which texture slice we wish to draw to. o.depthSlice = v.instanceId; return o; } |
The following is a frame capture when using an instanced draw call.
Slice 0

Slice 1

Final Notes About the Sample Project
The texture array script component can be located on the camera object in both scenes. You can dynamically change which slice of the texture array is being rendered to the game view by changing the “Texture Slice to Render” property.

That’s it folks! Download and enjoy! =D