Overview:
One of the great things about Unity is that it welcomes different kinds of developers with different skills and abilities. For example, perhaps you are an Artist with no computer science degree. No problem! You can make stuff with Unity! Perhaps you are a Tech Artist and you are comfortable with C# and shaders. Welcome aboard the Unity boat! Perhaps you are a low-level GPU coder that speaks DirectX/OpenGL/Vulkan/etc. Unity will accept you are your ilk as well. =) Unity offers development experiences for various skill levels. This article is aimed at the low-level graphics developer. The goal of this article is to demonstrate how you can extend Unity by writing custom native rendering plugins. With a rendering plugin, you can use the same graphics device/context that Unity uses to render whatever you want however you want.
What Are We Gonna Make?
Great Question! I don’t know yet. j/k!
One nice aspect of Unity is that it supports a wide variety of asset types. For example, Unity supports 3d model formats like obj, fbx, blend, maya scene files (if you have maya installed), etc. As for textures, Unity supports png, jpg, bmp, psd, etc. When Unity loads your project, it imports these asset files into an Asset Database in an internal format that the Unity engine uses. At the end of the day, when Unity attempts to render the assets, it must use the native Graphics API to do so. For this article, I have chosen to focus on the DirectX11 graphics API.

However, the principles of this article apply to all supported graphics APIs. In the case of DirectX, to render a model we need an index Buffer, vertex buffer, and a texture. Unity provides access to each of these through the scripting API. The following are the Unity scripting APIs you would use to get each of the native graphic API resource pointers.
- Mesh Class’ GetNativeIndexBufferPtr() provides the index buffer (I.E. ID3D11Buffer*)
- Mesh Class’ GetNativeVertexBufferPtr() provides the vertex buffer (I.E. ID3D11Buffer*)
- Texture Class’ GetNativeTexturePtr() provides the texture resource (I.E. ID3D11Resource*)
If you have access to the index/vertex buffers and texture resource for a 3d model, you can render it yourself in a native plugin! So that is what we are going to do! In general, you would not do this. You should typically let Unity render your 3D models for you. However, I think this is a good example to demonstrate how to pass all the native graphic resources from Unity to a native plugin. We are also going to pass world/view/ and projection matrices from Unity to the native plugin so we don’t have to calculate them on our own in the native plugin. Doing so will also give us the ability to control how the 3D model is rendered from a transform component!
Code from a Bird’s Eye View
We will be using two separate projects for this example. The first project will be the Unity project which will include the 3d model and texture assets along with our scripts which will make use of the native plugin. The second project will be our native rendering plugin built with C++ and DirectX11. I have tried to comment the code in both projects to explain what I am doing. Therefore in this article, I am mostly going to try to cover the gotchas.
Unity Project
To use a native plugin in Unity, you need to place it in your projects Asset/Plugins directory like so.

From there, you can configure which platforms and architectures should be able to use your plugin. Your native plugin will only be loaded if a script in your project actually invokes one of the methods in the plugin. The plugin will not be unloaded until the Unity Editor/Player shuts down. This means that if you want to make a modification to the plugin, you will need to restart the Unity Editor/Player before you can use the modified plugin.
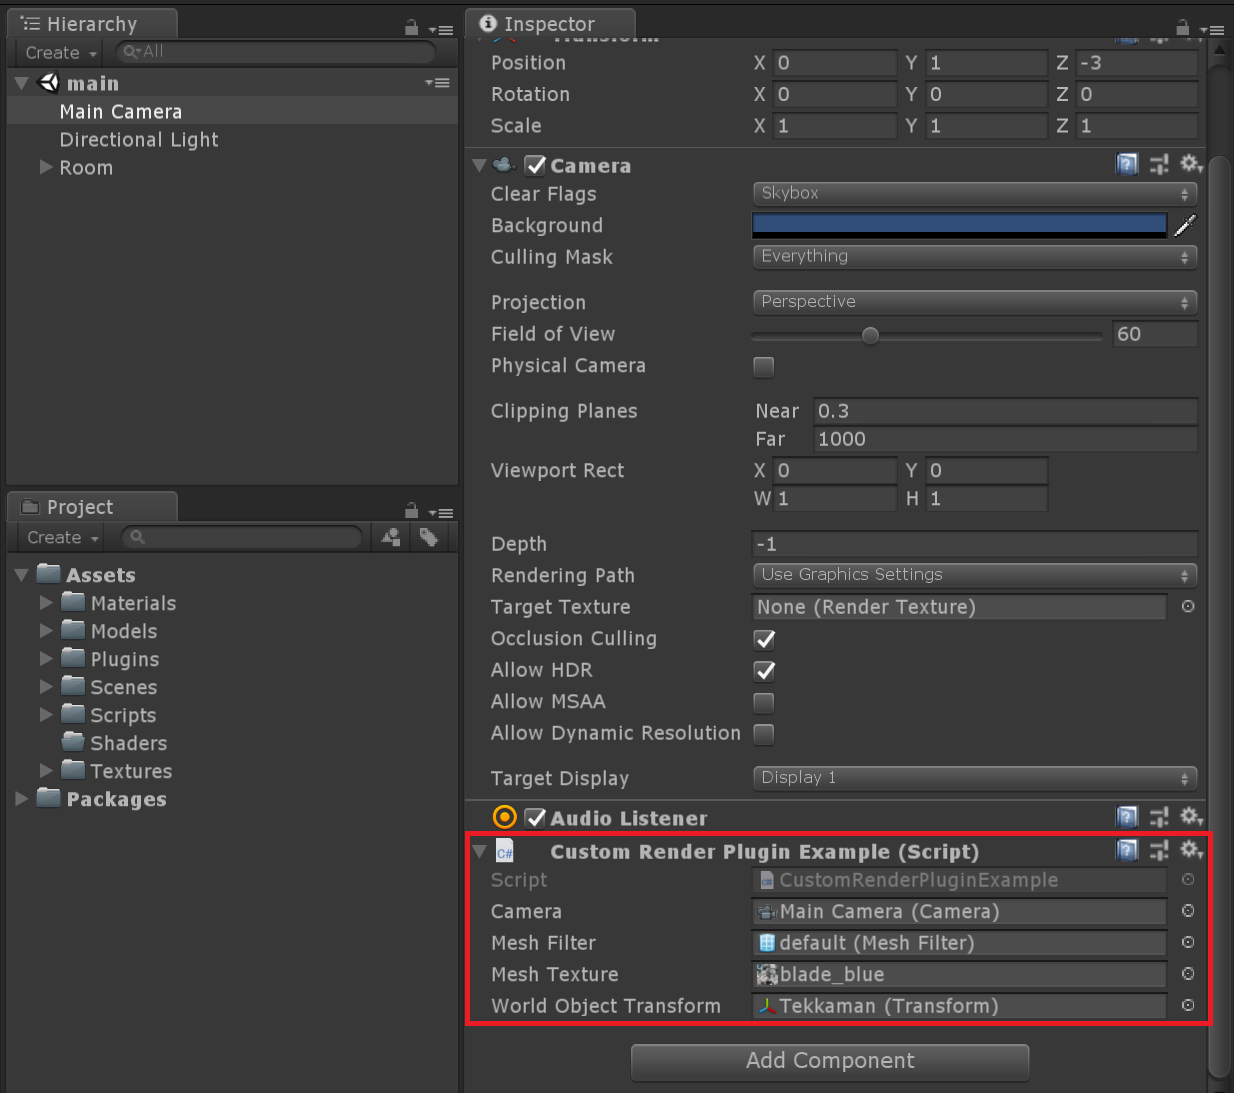
We will be using the “CustomRenderPluginExample” component to interface between Unity and our native plugin. You will find it on the main camera game object like so,
Below, you will find the source code for the component and comments with regards to how it is implemented.
CustomRenderPuginExample.cs
|
1 2 3 4 5 6 7 8 9 10 11 12 13 14 15 16 17 18 19 20 21 22 23 24 25 26 27 28 29 30 31 32 33 34 35 36 37 38 39 40 41 42 43 44 45 46 47 48 49 50 51 52 53 54 55 56 57 58 59 60 61 62 63 64 65 66 67 68 69 70 71 72 73 74 75 76 77 78 79 80 81 82 83 84 85 86 87 88 89 90 91 92 93 94 95 96 97 98 99 100 101 102 103 104 105 106 107 108 109 110 111 112 113 114 115 116 117 118 119 120 121 122 123 124 125 126 127 128 129 130 131 132 133 134 135 136 137 138 139 140 141 142 143 144 145 146 147 148 149 150 151 152 153 154 |
// The following script demonstrates how to // send native index/vertex pointer and texture resource // to the native rendering plugin. This script will // also send the object and camera's transform data to // the native plugin so it doesn't need to be recalculated. using System.Collections; using System.Collections.Generic; using UnityEngine; using UnityEngine.Rendering; using System.Runtime.InteropServices; public class CustomRenderPluginExample : MonoBehaviour { public Camera m_Camera = null; public MeshFilter m_MeshFilter = null; public Texture2D m_MeshTexture = null; public Transform m_WorldObjectTransform = null; // SetupResources and GetRenderEventFunc are the two methods found in our native rendering plugin. [DllImport("NativeRenderingPlugin")] private static extern void SetupResources(System.IntPtr nativeIndexBuffer, System.IntPtr nativeVertexBuffer, System.IntPtr nativeTextureResource); // GetRenderEventFunc will return a native function pointer to our native DoRenderEvent method // which will ultimately intialize our native graphics state object and handle the native rendering of // our mesh. [DllImport("NativeRenderingPlugin")] private static extern System.IntPtr GetRenderEventFunc(); CommandBuffer cb = null; System.IntPtr nativeRenderingDataPtr; enum CustomRenderEvent { // 3245 is a random number I made up. // I figured it could be useful to send an event id // to the native plugin which corresponds to when // the mesh is being rendered in the render pipeline. AfterForwardOpaque = 3245, } // These are the matrices we are going to send from Unity to // the native rendering plugin. [StructLayout(LayoutKind.Sequential, CharSet = CharSet.Ansi)] struct NativeRenderingData { public const int Size = sizeof(float) * 16 + sizeof(float) * 16 + sizeof(float) * 16; [MarshalAs(UnmanagedType.ByValArray, SizeConst = 16)] public float[] localToWorldMatrix; [MarshalAs(UnmanagedType.ByValArray, SizeConst = 16)] public float[] worldToViewMatrix; [MarshalAs(UnmanagedType.ByValArray, SizeConst = 16)] public float[] viewToProjectionMatrix; }; NativeRenderingData nativeRenderingData = new NativeRenderingData(); // Use this for initialization void Awake() { Mesh mesh = m_MeshFilter.sharedMesh; System.IntPtr nativeIndexBufferPtr = mesh.GetNativeIndexBufferPtr(); System.IntPtr nativeVertexBufferPtr = mesh.GetNativeVertexBufferPtr(0); System.IntPtr nativeTexturePtr = m_MeshTexture.GetNativeTexturePtr(); // Pass the native graphics API index/vertex/texture // pointers to the native rendering plugin. SetupResources(nativeIndexBufferPtr, nativeVertexBufferPtr, nativeTexturePtr); nativeRenderingData = new NativeRenderingData(); nativeRenderingData.localToWorldMatrix = new float[16]; nativeRenderingData.worldToViewMatrix = new float[16]; nativeRenderingData.viewToProjectionMatrix = new float[16]; // Allocate unmanaged memory to hold all three of our matrices that we // weish to send to our native rendering plugin. nativeRenderingDataPtr = Marshal.AllocHGlobal(NativeRenderingData.Size); cb = new CommandBuffer(); } // There might be a better way to do this but // I want to marshal the C# Matrix4x4 data to C++ // without any marshaling issues. void MatrixToFloatArray(Matrix4x4 m, ref float[] outputFloatArray) { outputFloatArray[0] = m.m00; outputFloatArray[1] = m.m01; outputFloatArray[2] = m.m02; outputFloatArray[3] = m.m03; outputFloatArray[4] = m.m10; outputFloatArray[5] = m.m11; outputFloatArray[6] = m.m12; outputFloatArray[7] = m.m13; outputFloatArray[8] = m.m20; outputFloatArray[9] = m.m21; outputFloatArray[10] = m.m22; outputFloatArray[11] = m.m23; outputFloatArray[12] = m.m30; outputFloatArray[13] = m.m31; outputFloatArray[14] = m.m32; outputFloatArray[15] = m.m33; } private void OnPreRender() { // If we didn't care about updating the matrix data dynamically, // we could just attach a single command buffer to our camera in the Start method. // However because we want our model to rotate, we need to update the matrix data in // the native rendering plugin. m_Camera.RemoveCommandBuffer(CameraEvent.AfterForwardOpaque, cb); cb.Release(); // Don't pass the camera's projection matrix directly into the plugin. // We need to calculate the GPU ready version of the projection matrix // which enable the projection matrix to play nicely with reverse z depth // testing and inverted uv coordinates to go from opengl to d3d11. // The projection matrix will also be modified such that the normalized device // coordinates for the z component will be converted from -1 to 1 (OpenGL) to 0 to 1 (DX11). Matrix4x4 projectionMatrix = m_Camera.projectionMatrix; projectionMatrix = GL.GetGPUProjectionMatrix(projectionMatrix, true); MatrixToFloatArray(m_WorldObjectTransform.localToWorldMatrix, ref nativeRenderingData.localToWorldMatrix); MatrixToFloatArray(m_Camera.worldToCameraMatrix, ref nativeRenderingData.worldToViewMatrix); MatrixToFloatArray(projectionMatrix, ref nativeRenderingData.viewToProjectionMatrix); // Copy our managed nativeRenderingData into the unmanaged memory pointed to by // the nativeRenderingDataPtr pointer. Marshal.StructureToPtr(nativeRenderingData, nativeRenderingDataPtr, true); cb = new CommandBuffer(); cb.name = "Native Rendering Plugin"; // The IssuePluginEventAndData will ensure our native rendering function is executed and receives // our custom rendering data when the command buffer is executed on the render thread. cb.IssuePluginEventAndData(GetRenderEventFunc(), (int)CustomRenderEvent.AfterForwardOpaque, nativeRenderingDataPtr); m_Camera.AddCommandBuffer(CameraEvent.AfterForwardOpaque, cb); } private void OnDestroy() { // Be a good Citizen and clean up after yourself. =D cb.Release(); Marshal.FreeHGlobal(nativeRenderingDataPtr); nativeRenderingDataPtr = System.IntPtr.Zero; } } |
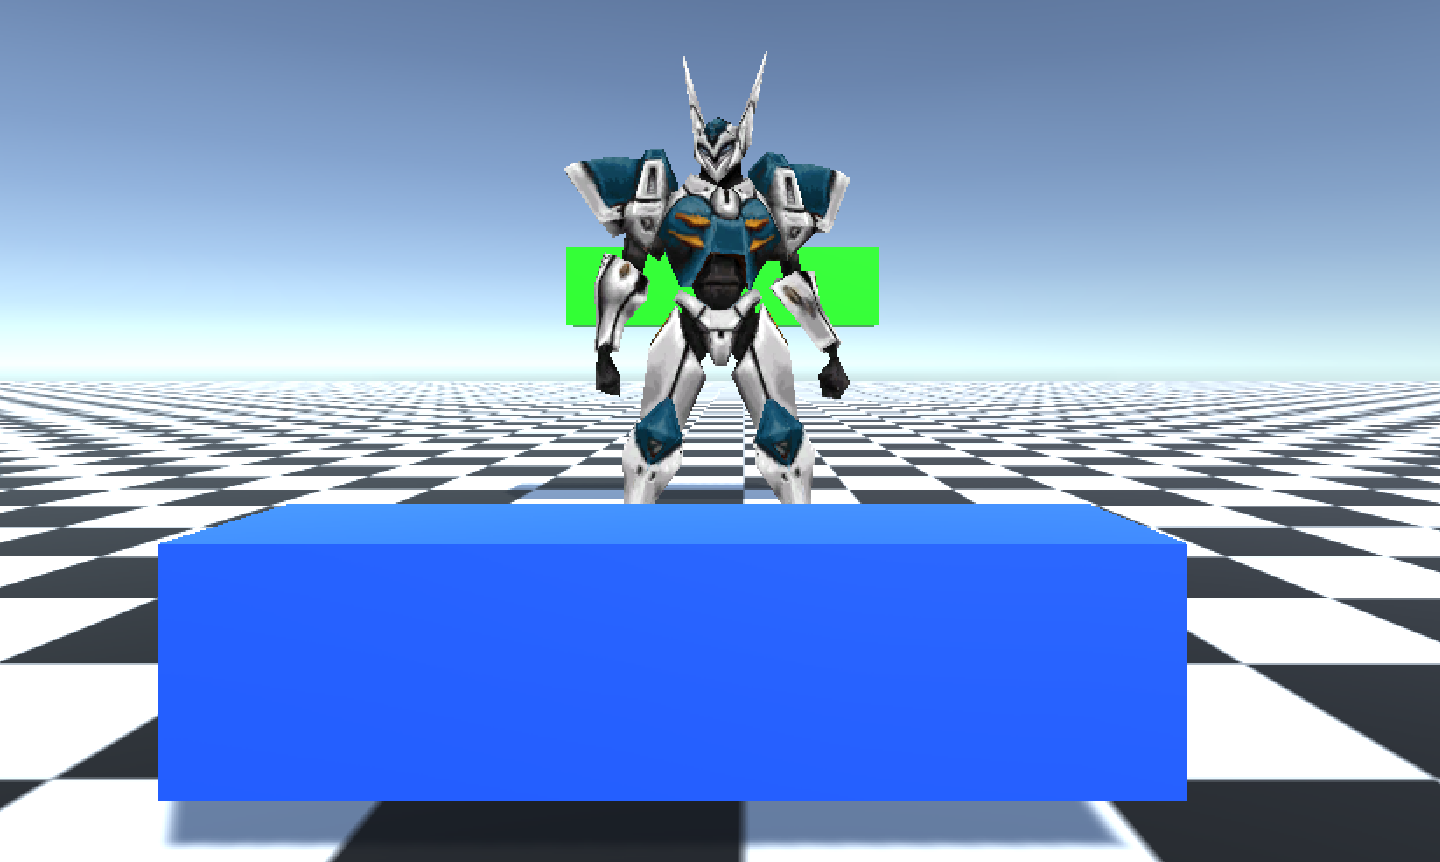
For this example, I want my native plugin to render the 3D model during the forward opaque render pass. This way my 3d model will appear correctly with respect to depth with objects rendered by Unity. In this example, my Tekkaman model will be rendered natively while the moving blocks are rendered by Unity.
The image below is a RenderDoc frame capture of my Unity Scene.
The EventBrowser shows the order in which Unity renders the scene including the low-level graphics API calls. For more information on the Unity/RenderDoc integration, click here.
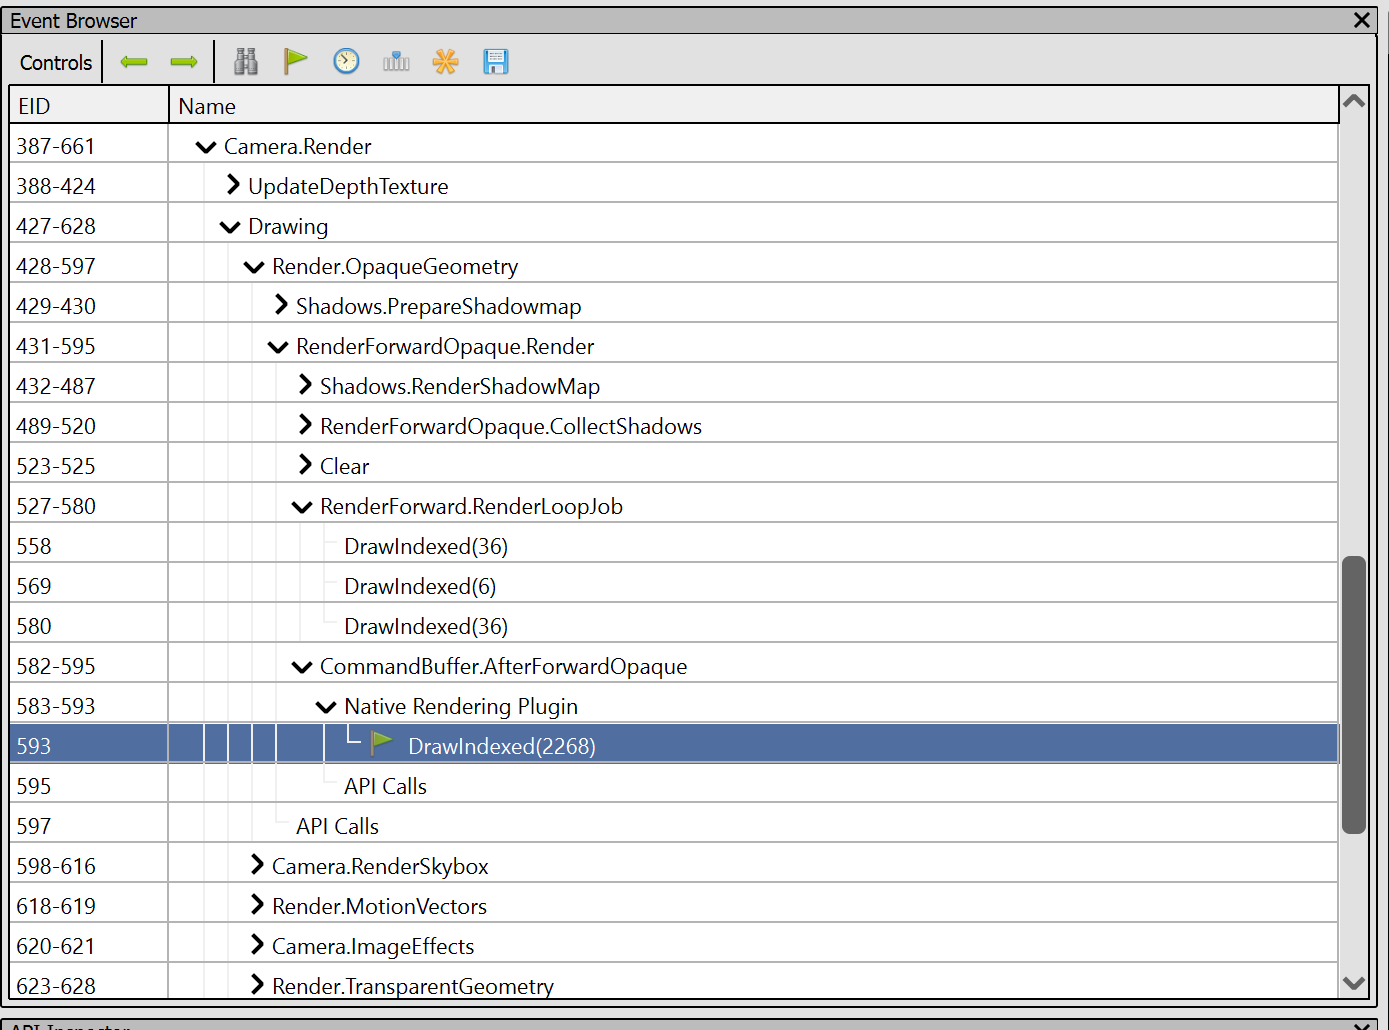
The following is a video clip showing the draw calls as they are executed. The last executed draw call is from the native rendering plugin.
This is achieved via Unity’s CommandBuffer system. Command Buffers are kind of like Unity’s version of a ID3D11DeviceContext. You fill the command buffer with commands like SetViewport, EnableScissors, etc, and then at some later point Unity will execute all the commands in your command buffer. When Unity is single-threaded, the commands are executed immediately. When Unity uses the multi-threaded renderer, all the commands are executed on the render thread. In our case, we just want Unity to give our native rendering plugin a heads up with regards to when it is ok to start rendering our 3D model which is after forward opaque objects have been rendered. Our 3D mesh will be rendered into Unity’s depth buffer so the render order won’t matter. The command we use to issue our plugin event is CommandBuffer.IssuePluginEventAndData. This command will allow us to pass a custom event id to our plugin along with custom data. The event id in our case isn’t too important. However, the custom data will contain the world/view/projection matrices for our 3D model to use.
As I pointed out in the comments, it is important to use GL.GetGPUProjectionMatrix to convert your project matrix into one that is correct for the graphics API you are using. Otherwise, you may get results like the following.
GL.GetGPUProjectionMatrix is needed to calculate the GPU ready version of the projection matrix which enables the projection matrix to play nicely with reverse z depth testing and inverted UV coordinates to go from OpenGL to d3d11. The projection matrix will also be modified such that the normalized device coordinates for the z component will be converted from -1 to 1 (OpenGL) to 0 to 1 (DX11).
Native C++ Render Plugin
I have documented the native plugin code as well. However, there are a few points I would like to call out. When you build a shader in Unity, you use the Unity ShaderLab language and the Unity Shader Compiler automagically translates it for whatever platform you are targeting. However, if you use a native plugin, you will need to use shaders built by hand for that platform. DirectX uses HLSL compiled bytecode as input into the graphics pipeline whereas OpenGL uses glsl as input. Since our plugin uses the DirectX API, we will need to compile our HLSL by hand. I wrote a batch file located in
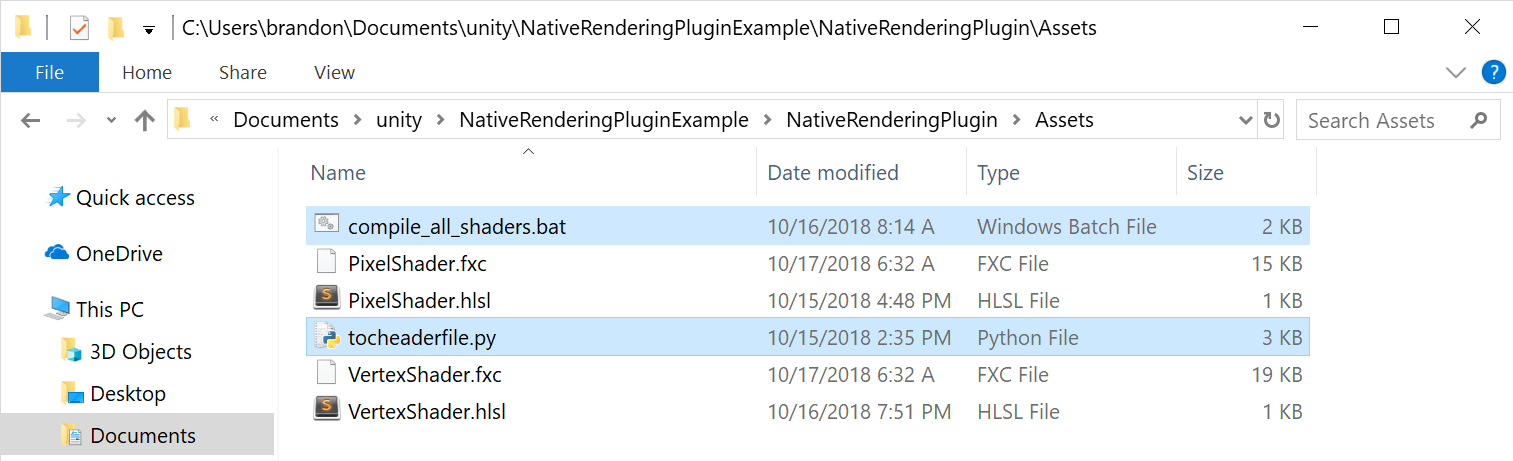
compile_all_shader.bat will be ran as a Custom Prebuild step when building the plugin in Visual Studio. The batch file will compile the shaders as release or debug based on your target. If the shaders are compiled with debug, the shader symbols will be included so you can see human readable shader uniforms and source code in a frame debuffer. The batch file will compile the shaders using Microsoft’s fxc hlsl compiler. Also, batch file will invoke my python script called “toheaderfile.py” which will convert the VertexShader.fxc and PixelShader.fxc output from the DirectX shader compiler into header files that can be included and statically linked into the native render plugin. This is nice because you can hide your shader source code and you don’t need to worry about loading the files manually.
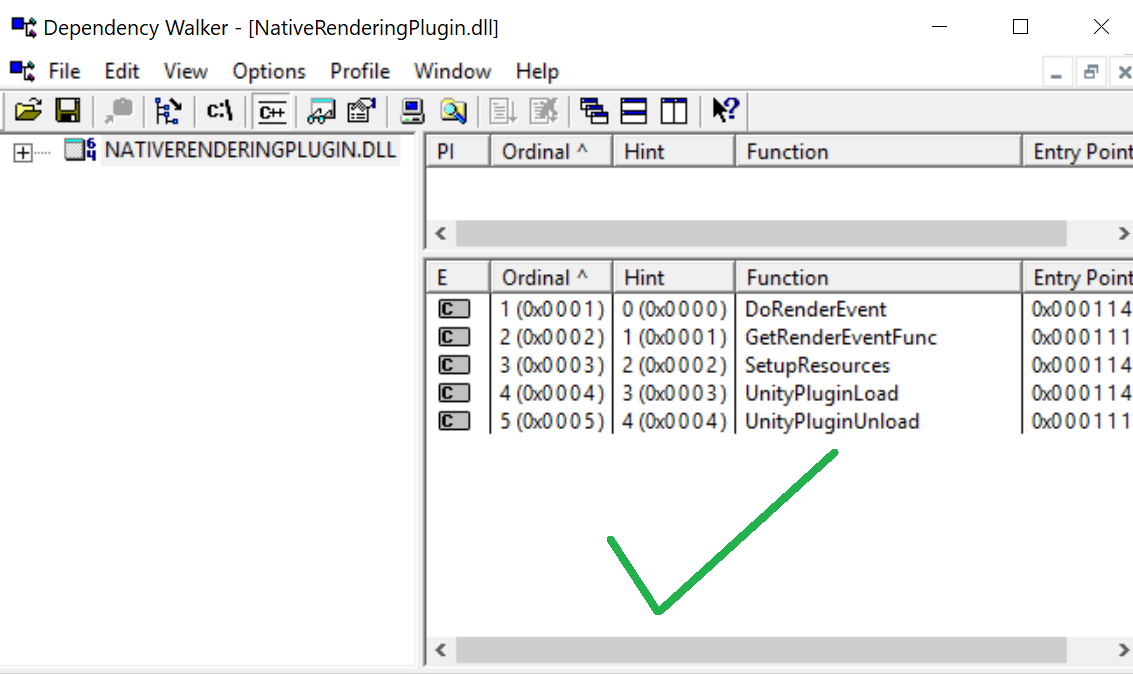
One last note is that you need to ensure that functions which are meant to be exposed to Unity are wrapped in extern “C”{} like so,
|
1 2 3 4 5 6 7 |
extern "C" { void UNITY_INTERFACE_EXPORT UNITY_INTERFACE_API SetupResources(void* indexBuffer, void* vertexBuffer, void* texture) { s_UnityRenderLogic.SetupResources(indexBuffer, vertexBuffer, texture); } } |
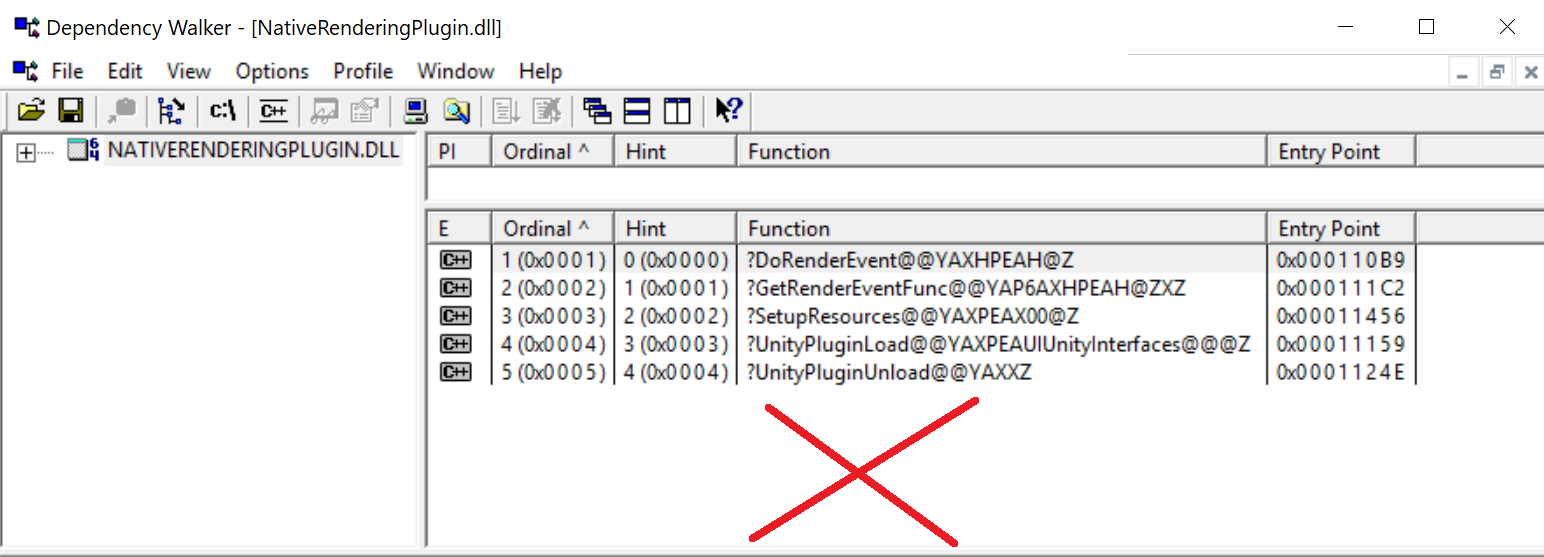
Unlike C, C++ allows for method overloading. In other words, C++ allows you to have a single method defined multiple times with different input arguments. To enable this, C++ must “mangle” the function names when compiled with additional identifier info for the various arguments so that it can jump to the correct one when executed in assembly. If you don’t wrap methods like this, then the C++ compiler will mangle the names of your methods. Unity won’t be able to find the exact method names you specified in your script after the DllImport declaration.
With extern “C”
Without extern “C”
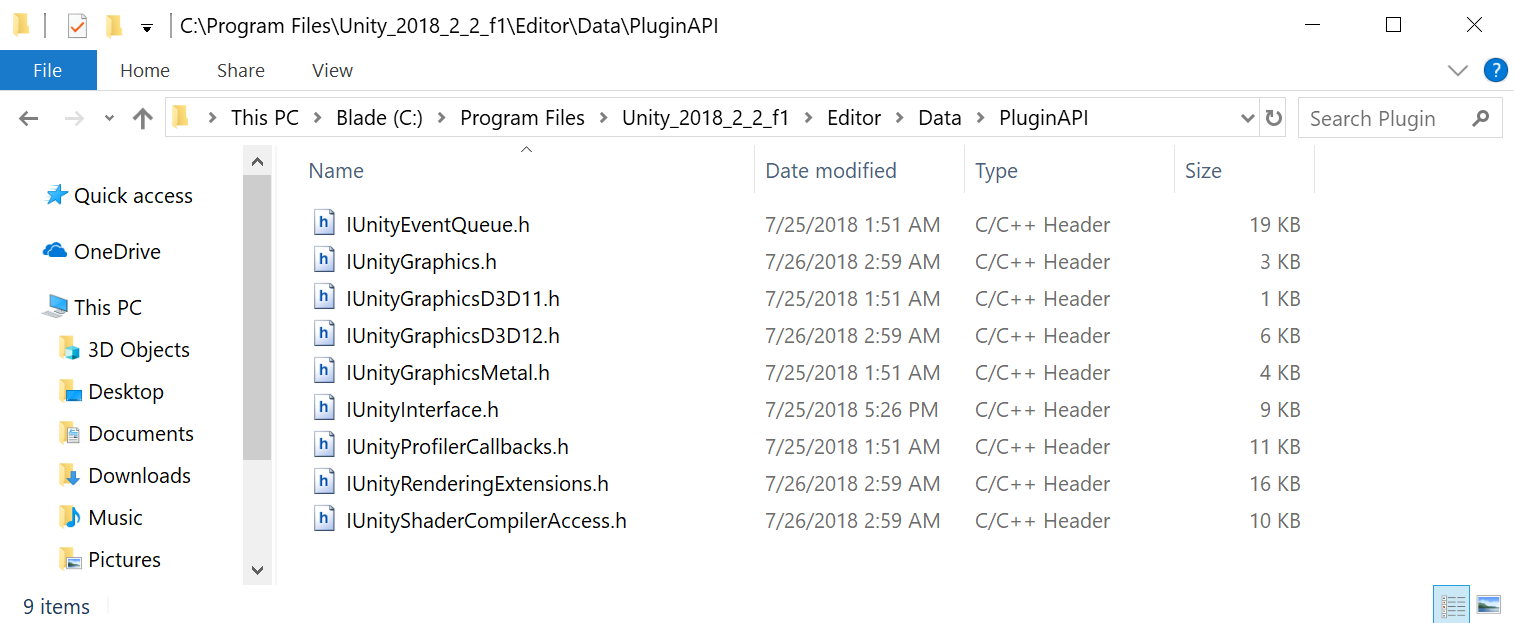
I have divided the native plugin into two sections. The first is the Unity plugin boiler plate code. The second is the DirectX rendering logic. Unity ships with C header files that you can include in your plugin to interface with the Unity Engine. You can find them in your Unity installation directory like so,
Unity\Editor\Data\PluginAPI
UnityRenderPlugin.cpp
|
1 2 3 4 5 6 7 8 9 10 11 12 13 14 15 16 17 18 19 20 21 22 23 24 25 26 27 28 29 30 31 32 33 34 35 36 37 38 39 40 41 42 43 44 45 46 47 48 49 50 51 52 53 54 55 56 57 58 59 60 61 62 63 64 65 66 67 68 69 70 71 72 73 74 75 76 77 78 79 80 81 82 83 84 85 86 87 88 89 90 91 92 93 94 95 96 97 98 99 100 101 102 103 104 105 106 107 108 109 110 111 112 113 |
// UnityRenderPlugin.cpp : Defines the exported functions for the DLL application. // This is mostly boiler plate Unity plugin code. // Our custom rendering logic is mostly encapsulated in UnityRenderLogic.cpp // The UnityRenderLogic class will be initialized, rendered with, and shutdown // via the UnityRenderPlugin code. #include "Microsoft/DirectX/include/D3D11.h" #include "Unity/IUnityInterface.h" #include "Unity/IUnityGraphics.h" #include "Unity/IUnityGraphicsD3D11.h" #include "UnityRenderLogic.h" using namespace std; static IUnityInterfaces* s_UnityInterfaces = NULL; static IUnityGraphics* s_Graphics = NULL; static UnityGfxRenderer s_RendererType = kUnityGfxRendererNull; static void UNITY_INTERFACE_API OnGraphicsDeviceEvent(UnityGfxDeviceEventType eventType); static void DoEventGraphicsDeviceD3D11(UnityGfxDeviceEventType eventType); static bool initialized = false; extern "C" { // Unity plugin load event void UNITY_INTERFACE_EXPORT UNITY_INTERFACE_API UnityPluginLoad(IUnityInterfaces* unityInterfaces) { s_UnityInterfaces = unityInterfaces; s_Graphics = unityInterfaces->Get(); s_Graphics->RegisterDeviceEventCallback(OnGraphicsDeviceEvent); // Run OnGraphicsDeviceEvent(initialize) manually on plugin load // to not miss the event in case the graphics device is already initialized OnGraphicsDeviceEvent(kUnityGfxDeviceEventInitialize); } // Unity plugin unload event void UNITY_INTERFACE_EXPORT UNITY_INTERFACE_API UnityPluginUnload() { s_Graphics->UnregisterDeviceEventCallback(OnGraphicsDeviceEvent); } void UNITY_INTERFACE_EXPORT UNITY_INTERFACE_API DoRenderEvent(int eventId, int* data) { if (!initialized) { s_UnityRenderLogic.Initialize(s_UnityInterfaces, eventId, data); initialized = true; } s_UnityRenderLogic.Render(s_UnityInterfaces, eventId, data); } UnityRenderingEvent UNITY_INTERFACE_EXPORT UNITY_INTERFACE_API GetRenderEventFunc() { return DoRenderEvent; } void UNITY_INTERFACE_EXPORT UNITY_INTERFACE_API SetupResources(void* indexBuffer, void* vertexBuffer, void* texture) { s_UnityRenderLogic.SetupResources(indexBuffer, vertexBuffer, texture); } } static void UNITY_INTERFACE_API OnGraphicsDeviceEvent(UnityGfxDeviceEventType eventType) { UnityGfxRenderer currentDeviceType = s_RendererType; switch (eventType) { case kUnityGfxDeviceEventInitialize: { //TODO: user initialization code initialized = false; break; } case kUnityGfxDeviceEventShutdown: { //TODO: user shutdown code s_UnityRenderLogic.Shutdown(s_UnityInterfaces); initialized = false; break; } case kUnityGfxDeviceEventBeforeReset: { //TODO: user Direct3D 9 code break; } case kUnityGfxDeviceEventAfterReset: { //TODO: user Direct3D 9 code break; } }; if (currentDeviceType == kUnityGfxRendererD3D11) { DoEventGraphicsDeviceD3D11(eventType); } } static void DoEventGraphicsDeviceD3D11(UnityGfxDeviceEventType eventType) { if (eventType == kUnityGfxDeviceEventInitialize) { } else if (eventType == kUnityGfxDeviceEventShutdown) { } } |
UnityRenderLogic.cpp
|
1 2 3 4 5 6 7 8 9 10 11 12 13 14 15 16 17 18 19 20 21 22 23 24 25 26 27 28 29 30 31 32 33 34 35 36 37 38 39 40 41 42 43 44 45 46 47 48 49 50 51 52 53 54 55 56 57 58 59 60 61 62 63 64 65 66 67 68 69 70 71 72 73 74 75 76 77 78 79 80 81 82 83 84 85 86 87 88 89 90 91 92 93 94 95 96 97 98 99 100 101 102 103 104 105 106 107 108 109 110 111 112 113 114 115 116 117 118 119 120 121 122 123 124 125 126 127 128 129 130 131 132 133 134 135 136 137 138 139 140 141 142 143 144 145 146 147 148 149 150 151 152 153 154 155 156 157 158 159 |
#include "UnityRenderLogic.h" #include "VertexShader.h" #include "PixelShader.h" // The Project will run a custom Pre-Build event // which will compile our shaders and statically link them // into the project. The compiled bytecode can be safely // referenced via vertexShaderByteCode and pixelShaderByteCode // which comes from the VertexShader.h and PixelShader.h // header files. Those header files are generated by an external // python script I wrote so make sure you have python installed. // The custom shader compiler batch file can be located in // Assets/compile_all_shaders.bat // The arguments are "-r" for release and "-d" for debug. // If you compile a debug build, shader symbols will be included. extern unsigned char vertexShaderByteCode[]; extern unsigned char pixelShaderByteCode[]; void UnityRenderLogic::Initialize(IUnityInterfaces* unityInterfaces, int eventId, int* data) { if (eventId != AfterForwardOpaque) return; IUnityGraphicsD3D11* d3d11 = unityInterfaces->Get(); dev = d3d11->GetDevice(); dev->GetImmediateContext(&devcon); InitializeGraphicPipeline(dev, devcon); } void UnityRenderLogic::Shutdown(IUnityInterfaces* unityInterfaces) { } void UnityRenderLogic::Render(IUnityInterfaces* unityInterfaces, int eventId, int* data) { if (eventId != AfterForwardOpaque) return; NativeRenderingData nativeRenderingData; memcpy(&nativeRenderingData, data, sizeof(nativeRenderingData)); RenderMesh(dev, devcon, nativeRenderingData); } void UnityRenderLogic::SetupResources(void* indexBuffer, void* vertexBuffer, void* texture) { nativeIndexBuffer = reinterpret_cast<ID3D11Buffer*>(indexBuffer); nativeVertexBuffer = reinterpret_cast<ID3D11Buffer*>(vertexBuffer); nativeTextureResource = reinterpret_cast<ID3D11Resource*>(texture); // It would be better for the C# script to tell us how many // indices there are in the mesh but for simplicity, we will // calculate it like this. D3D11_BUFFER_DESC indexBufferDesc; nativeIndexBuffer->GetDesc(&indexBufferDesc); indexCount = indexBufferDesc.ByteWidth / 2; } int UnityRenderLogic::CalculateVertexBufferStride(D3D11_INPUT_ELEMENT_DESC* inputElementDesc, int count) { unsigned int sum = 0; // sizeof(DXGI_FORMAT_R32G32B32_FLOAT) = 32 bits * 3 == 96 bits // 96 / 8 = 12 bytes; for (int i = 0; i < count; ++i) { switch (inputElementDesc[i].Format) { case DXGI_FORMAT_R32G32B32_FLOAT: sum += 12; break; case DXGI_FORMAT_R32G32B32A32_FLOAT: sum += 16; break; case DXGI_FORMAT_R32G32_FLOAT: sum += 8; break; } } return sum; } void UnityRenderLogic::InitializeGraphicPipeline(ComPtr& dev, ComPtr& devcon) { // This is meant to be an example so I am not too concerned with error handling. // You may wonder how I magically know all the formats and sizes that should be used // when creating the various pipeline state objects. Afterall, some of these details // are not documented. To figure out the various state information, I made Unity render // my model normally and then I took a RenderDoc capture and examined the input into // each of the Graphics API calls. unsigned int vertexByteCodeLength = sizeof(vertexShaderByteCode); HRESULT hr = S_OK; hr = dev->CreateVertexShader((const void*)vertexShaderByteCode, vertexByteCodeLength, 0, vertexShader.GetAddressOf()); hr = dev->CreatePixelShader((const void*)pixelShaderByteCode, sizeof(pixelShaderByteCode), 0, pixelShader.GetAddressOf()); devcon->VSSetShader(vertexShader.Get(), 0, 0); devcon->PSSetShader(pixelShader.Get(), 0, 0); D3D11_INPUT_ELEMENT_DESC inputElementDesc[4] = { { "POSITION", 0, DXGI_FORMAT_R32G32B32_FLOAT, 0, 0, D3D11_INPUT_PER_VERTEX_DATA, 0 }, { "NORMAL", 0, DXGI_FORMAT_R32G32B32_FLOAT, 0, 12, D3D11_INPUT_PER_VERTEX_DATA, 0 }, { "TANGENT", 0, DXGI_FORMAT_R32G32B32A32_FLOAT, 0, 24, D3D11_INPUT_PER_VERTEX_DATA, 0 }, { "TEXCOORD", 0, DXGI_FORMAT_R32G32_FLOAT, 0, 40, D3D11_INPUT_PER_VERTEX_DATA, 0 }, }; unsigned int inputElementCount = sizeof(inputElementDesc) / sizeof(D3D11_INPUT_ELEMENT_DESC); vertexBufferStride = CalculateVertexBufferStride(inputElementDesc, inputElementCount); hr = dev->CreateInputLayout(inputElementDesc, inputElementCount, (const void*)vertexShaderByteCode, vertexByteCodeLength, &vertexInputLayout); D3D11_SHADER_RESOURCE_VIEW_DESC srvDesc = {}; srvDesc.ViewDimension = D3D11_SRV_DIMENSION_TEXTURE2D; srvDesc.Format = DXGI_FORMAT_BC1_UNORM; srvDesc.Texture2D.MostDetailedMip = 0; srvDesc.Texture2D.MipLevels = 9; hr = dev->CreateShaderResourceView(nativeTextureResource.Get(), &srvDesc, nativeTextureResourceView.GetAddressOf()); D3D11_SAMPLER_DESC samplerDesc = {}; samplerDesc.Filter = D3D11_FILTER_MIN_MAG_LINEAR_MIP_POINT; samplerDesc.AddressU = D3D11_TEXTURE_ADDRESS_WRAP; samplerDesc.AddressV = D3D11_TEXTURE_ADDRESS_WRAP; samplerDesc.AddressW = D3D11_TEXTURE_ADDRESS_WRAP; samplerDesc.MipLODBias = 0.0f; samplerDesc.MaxAnisotropy = 1; samplerDesc.ComparisonFunc = D3D11_COMPARISON_GREATER; hr = dev->CreateSamplerState(&samplerDesc, samplerState.GetAddressOf()); D3D11_BUFFER_DESC constantBufferDesc = { 0 }; constantBufferDesc.Usage = D3D11_USAGE_DEFAULT; constantBufferDesc.ByteWidth = sizeof(NativeRenderingData); constantBufferDesc.BindFlags = D3D11_BIND_CONSTANT_BUFFER; hr = dev->CreateBuffer(&constantBufferDesc, nullptr, constantBuffer.GetAddressOf()); } void UnityRenderLogic::RenderMesh(ComPtr& dev, ComPtr& devcon, NativeRenderingData& nativeRenderingData) { unsigned int strides[1] = { vertexBufferStride }; unsigned int offsets[1] = { 0 }; devcon->VSSetShader(vertexShader.Get(), 0, 0); devcon->PSSetShader(pixelShader.Get(), 0, 0); devcon->PSSetShaderResources(0, 1, nativeTextureResourceView.GetAddressOf()); devcon->PSSetSamplers(0, 1, samplerState.GetAddressOf()); devcon->VSSetConstantBuffers(0, 1, constantBuffer.GetAddressOf()); devcon->UpdateSubresource(constantBuffer.Get(), 0, 0, &nativeRenderingData, 0, 0); devcon->IASetInputLayout(vertexInputLayout.Get()); devcon->IASetIndexBuffer(nativeIndexBuffer.Get(), DXGI_FORMAT_R16_UINT, 0); devcon->IASetVertexBuffers(0, 1, nativeVertexBuffer.GetAddressOf(), strides, offsets); devcon->DrawIndexed(indexCount, 0, 0); } |
To figure out some of the graphic pipeline states that Unity uses, like the index buffer format and vertex attributes, I just dragged my model into my Unity project and had Unity render it. Then I took a frame capture and took note of all the state information. RenderDoc has a pretty useful feature that will allow you to see the resource creation parameters for any resource referenced in a graphics API call. You do need to understand how the various low-level graphics API commands work in order to find their creation state. I needed to know which vertex attributes and corresponding formats Unity expected to be in the vertex input layout. I know that for DirectX11, you must call ID3D11Device::CreateInputLayout to specify the vertex attributes that will be used in the vertex buffer along with their corresponding formats. Therefore I knew Unity must be making a call to CreateInputLayout before rendering my model. The following demonstrates how I went about finding the vertex attributes.
If you want to know more about writing native rendering plugins for Unity, take a look at the official Unity documentation on the subject below.
- https://docs.unity3d.com/2018.3/Documentation/Manual/NativePlugins.html
- https://docs.unity3d.com/2018.3/Documentation/Manual/NativePluginInterface.html
Well that is it folks. Download/Enjoy and then Go Create!